Jiliuke

激流客

Docker 安装rabbitmq

management的意思是带有UI的rabbitmq,如果需要web gui,安装带-management的版本,然后通过浏览器访问http://localhost:15672即可访问web gui,访问密钥默认是guest/guest.

1
docker run -d --name rabbitmq -p 5672:5672 -p 15672:15672 rabbitmq:3.12-management

Debian buster生命周期已结束, 可离线打包本地的包

安装 dpkg-repack 工具:

1
2
sudo apt-get update
sudo apt-get install dpkg-repack

列出已安装的软件包:
你可以使用 dpkg -l 命令列出系统上已安装的软件包,找到你想要重新打包的软件包名称。

1
dpkg -l | grep <package-name>

使用 dpkg-repack 重新打包:
运行以下命令,将 替换为你想要重新打包的软件包名称:

1
sudo dpkg-repack <package-name>

deb.sury.org 不再提供包,本地打包以便后续继续使用

1
dpkg -l|grep php8.2 | awk '/^ii/ {print $2}'| xargs -I {} sudo dpkg-repack {}

如果 docker ps -a 中太多,一次性删除方法

1
docker rm `docker ps -a -q --filter 'status=exited'`

debian apparmor linux内核安全模块影响docker运行,本地操作系统可以直接移除此包

1
sudo apt-get purge apparmor

docker使用代理获取镜像

某些原因docker被封禁,使用以下方法可以绕过

1
2
3
4
5
6
7
8
9
10
11
12
13
14
15
16
17
18
19
20
21
22
23
24
25
26
27
28
29
30
修改 daemon.json 文件

sudo vi /etc/docker/daemon.json
添加如下内容,使用官方镜像

{
"registry-mirrors": [
"https://hub.docker.com/"]
}

新建 proxy.conf 文件

mkdir -p /etc/systemd/system/docker.service.d
cd /etc/systemd/system/docker.service.d
touch proxy.conf
sudi vi /etc/systemd/system/docker.service.d/proxy.conf
添加如下内容:

[Service]
Environment="HTTP_PROXY=http://127.0.0.1:8889"
Environment="HTTPS_PROXY=http://127.0.0.1:8889"
重启 docker 服务

#加载变更的配置
systemctl daemon-reload
#重启docker服务
systemctl restart docker
查看配置是否生效

systemctl show --property=Environment docker

局域网远程开机(WOL)

前置条件,主板需要支持wakonlan,Deepin 20.9 为例

1.查看lan网卡是否开启WOL

1
sudo ethtool enp3s0

如果 Wake-on: d 表示未开启

2.设置 wake-on: g 开启WOL

1
sudo ethtool -s enp3s0 wol g

3.设置开机自启动

添加rc.local文件
sudo vim /etc/rc.local

1
2
3
4
5
6
7
8
9
10
11
12
13
14
15
16
17
#!/bin/bash
#
# rc.local
#
# This script is executed at the end of each multiuser runlevel.
# Make sure that the script will "exit 0" on success or any other
# value on error.
#
# In order to enable or disable this script just change the execution
# bits.
#
# By default this script does nothing.

/usr/sbin/ethtool -s enp3s0 wol g

exit 0

1
2
sudo chmod +x /etc/rc.local
sudo systemctl enable rc-local

然后重启计算机

4.另外一台局域网电脑安装wakeonlan

1
sudo apt-get install etherwake

5.发送数据包到上面配置的电脑的MAC地址启动

1
wakeonlan {MAC Address}

1.PHP Unit Testing

1
2
3
4
5
6
7
8
9
10
11
12
13
14
15
16
17
18
19
20
21
22
23
24
25
26
27
28
29
30
31
32
33
34
35
36
37
38
39
40
41
42
43
44
45
46
<?php

namespace DYL\Test\Test\Unit\Plugin\Framework\DB;

use PHPUnit\Framework\TestCase;
use DYL\Test\Plugin\Framework\DB\FieldDataConverter;
use Magento\Framework\DB\Query\BatchRangeIteratorFactory;

class FieldDataConverterTest extends TestCase
{
public function setUp(): void
{
$test1 = $this->createMock(\DYL\Test\Model\Test1::class);
$selectFactory = $this->createMock(\Magento\Framework\DB\SelectFactory::class);
$test2 = $this->createMock(\DYL\Test\Helper\Test2::class);
$batchRangeIteratorFactory = $this->createMock(BatchRangeIteratorFactory::class);
$this->fieldDataConverter = new FieldDataConverter(
$test1,
$selectFactory,
$test2,
$batchRangeIteratorFactory
);
}

/**
* @dataProvider getExampleKeys
* @return void
*/
public function testGetExampleKey($key, $expected)
{
$result = $this->fieldDataConverter->getExampleKey($key);
$this->assertEquals($expected, $result);
}

/**
* Get example values
* @return array[]
*/
public function getExampleKeys()
{
return [
['test1-test2-test3', 'test3'],
];
}
}

2.JavaScript testing

首先需要进入项目目录
使用最新的package.json

1
2
cp package.json.sample package.json
npm install

启动testing,添加参数-v可以看到更多调试信息

1
node /home/dyl/.config/nvm/versions/node/v20.12.1/bin/grunt spec:luma --file="dev/tests/js/jasmine/tests/app/code/Magento/Ui/base/js/grid/columns/actions.test.js"

调试启动

1
node --inspect-brk /home/dyl/.config/nvm/versions/node/v20.12.1/bin/grunt spec:luma --file="dev/tests/js/jasmine/tests/app/code/Magento/Ui/base/js/grid/columns/actions.test.js"

chrome浏览器输入chrome://inspect,应该能看到监听的node请求

1.同步生产站点的静态内容数据

例如首页幻灯片,contact-us页面内容等,需要同步的表如下

1
2
3
4
5
6
7
8
cms_block
cms_block_store
cms_page
cms_page_store
sequence_cms_block
sequence_cms_page
staging_update
flag //其中的staging的值必须在staging_update中存在

1.在自定义dom上显示数据loading状态

define 引用 loader 组件并初始化为loader变量,接着设置加载icon,然后调用show显示加载中,调用hide隐藏加载中。

1
2
3
4
5
6
7
8
9
10
11
12
13
define([
...
'loader',
...
],function(...,loader,...){
let overviewContent = $(this).parent().find('.overview-content');

overviewContent.loader({icon: self.options.loadingImg});
overviewContent.loader('show');//显示loader
...
overviewContent.loader('hide');//数据加载完成后隐藏loader

})

参考链接
https://developer.adobe.com/commerce/frontend-core/javascript/jquery-widgets/loader/

2.在Magento2 Js 中再加载js组件

1
2
3
4
5
6
7
define([
...
'mage/apply/main',
...
],function(...,main,...){
main.applyFor('.content-card','{}','swiperOverviewImages');
})

参考链接
https://fishpig.co.uk/magento/tutorials/manually-load-js-component-magento-2/

最新的 XHGUI 用法

https://github.com/michaeldyl520/xhgui

最新的自修改xhgui搭配mongodb用法如下

  1. 在程序入口index.php添加以下代码即可开始分析
    1
    2
    3
    4
    5
    require_once '/path/to/xhgui/vendor/perftools/php-profiler/autoload.php';

    $config = require_once '/path/to/xhgui/config/config.php';
    $profiler = new \Xhgui\Profiler\Profiler($config);
    $profiler->start();
    1
    2
    3
    4
    5
    6
    7
    8
    9
    10
    11
    12
    13
    14
    15
    16
    17
    18
    19
    20
    21
    22
    23
    24
    25
    26
    27
    28
    29
    30
    31
    32
    33
    34
    35
    36
    37
    38
    39
    40
    41
    42
    43
    <?php
    /**
    * Default configuration for PHP Profiler.
    *
    * config.php
    * To change these, create a file called `config.php` file in the same directory
    * and return an array from there with your overriding settings.
    */

    use Xhgui\Profiler\Profiler;
    use Xhgui\Profiler\ProfilingFlags;

    return array(
    'save.handler' => Profiler::SAVER_STACK,
    'save.handler.stack' => array(
    'savers' => array(
    Profiler::SAVER_UPLOAD
    ),
    'saveAll' => false,
    ),
    'save.handler.upload' => array(
    'url' => 'https://www.xhgui.local/run/import',
    // The timeout option is in seconds and defaults to 3 if unspecified.
    'timeout' => 3,
    // the token must match 'upload.token' config in XHGui
    'token' => '',
    ),
    'profiler.enable' => function () {
    return true;
    },
    'profiler.flags' => array(
    ProfilingFlags::CPU,
    ProfilingFlags::MEMORY,
    ProfilingFlags::NO_BUILTINS,
    ProfilingFlags::NO_SPANS,
    ),
    'profiler.options' => array(),
    'profiler.exclude-env' => array(),
    'profiler.simple_url' => function ($url) {
    return preg_replace('/=\d+/', '', $url);
    },
    'profiler.replace_url' => null,
    );

Composer 小技巧

1. 自定义安装包的方法

adobe 官方已不支持stripe-payment 3.2.8,需要用composer 自定义的方式安装包
composer配置方法

1
2
3
4
5
6
7
8
9
10
11
12
13
14
15
16
17
18
19
20
21
22
23
24
25
26
27
28
29
{
......
"repositories": {
"0":{
"type": "composer",
"url": "https://repo.magento.com/"
},
"1": {
"type": "package",
"package": {
"name": "stripe/module-payments",
"version": "3.2.8",
"dist": {
"url": "https://github.com/stripe/stripe-magento2-releases/raw/master/stripe-magento2-3.2.8.tgz",
"type": "tar"
},
"autoload":{
"files": [
"code/StripeIntegration/Payments/registration.php"
],
"psr-4": {
"StripeIntegration\\Payments\\": "code/StripeIntegration/Payments/"
}
}
}
}
},
......
}

然后终端中在项目目录下使用 composer require stripe/module-payments:3.2.8 安装。

安装代码标准

使用magento2官方的代码标准,如果需要在开发工具中提示代码规范的问题,需要在安装magento2后执行以下shell

1
vendor/bin/phpcs --config-set installed_paths vendor/magento/magento-coding-standard,vendor/phpcompatibility/php-compatibility/PHPCompatibility

PhpStorm 自动格式化的一些配置

自动对齐的问题

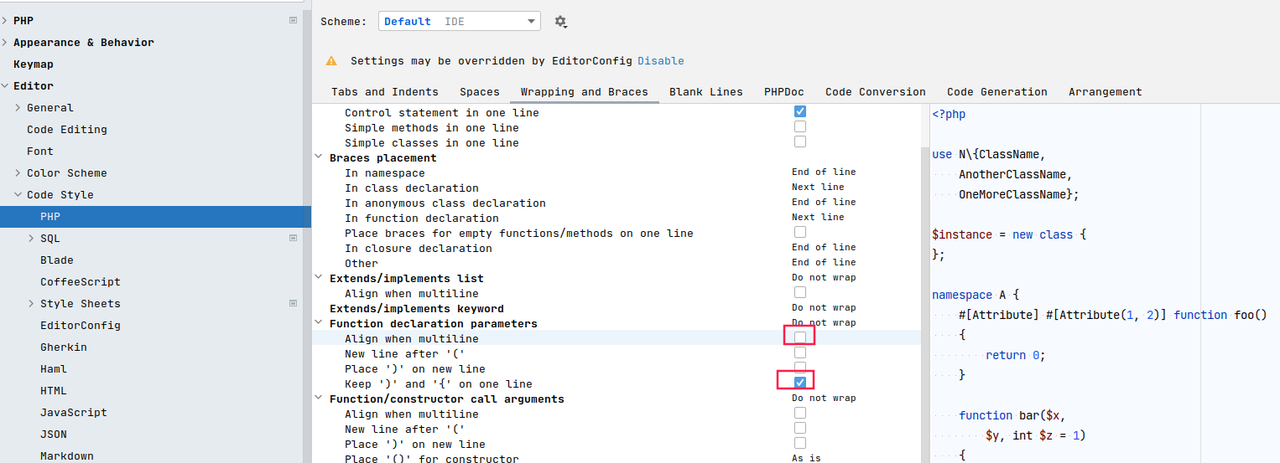
高版本PhpStorm Function如果有多个变量并换行,会自动两边对齐属性,不符合代码规范,需要在Settings>Editor>Code Style>PHP->Wrapping and Braces->Function declaration parameters中去掉Align when multiline的勾选框且勾选Keep ')' and '{' on one line

自动对齐的问题

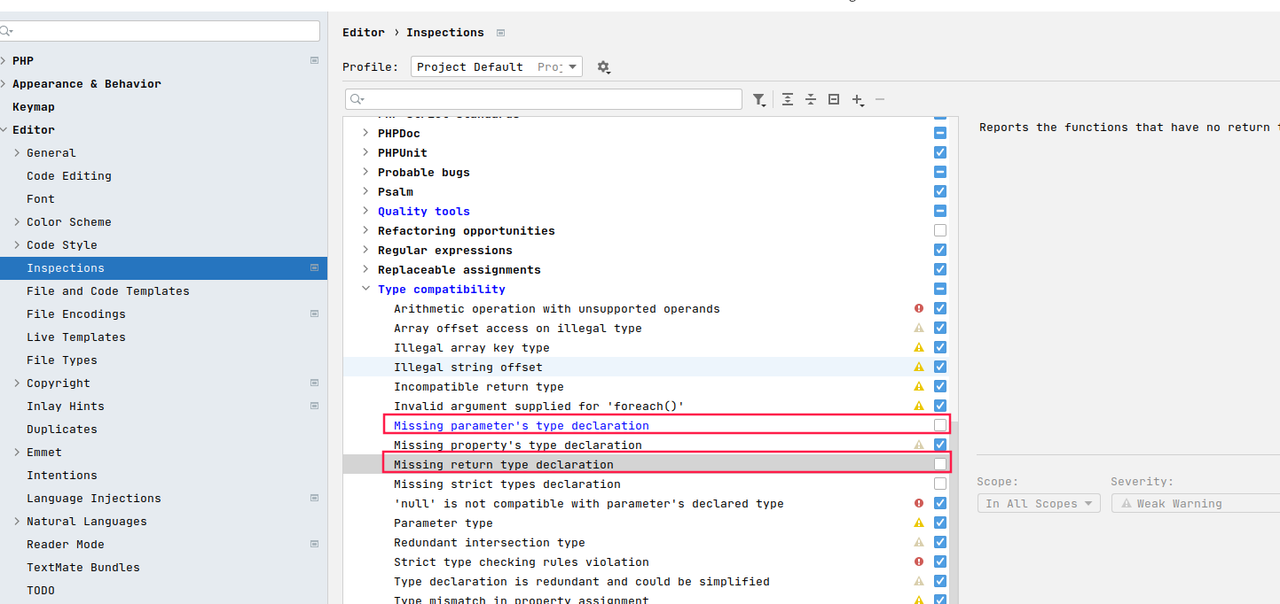
强制限定类型的提示问题

Magento2 PHP不需要做强制类型限定参照图去掉以下两个复选框。

强制限定类型的提示问题

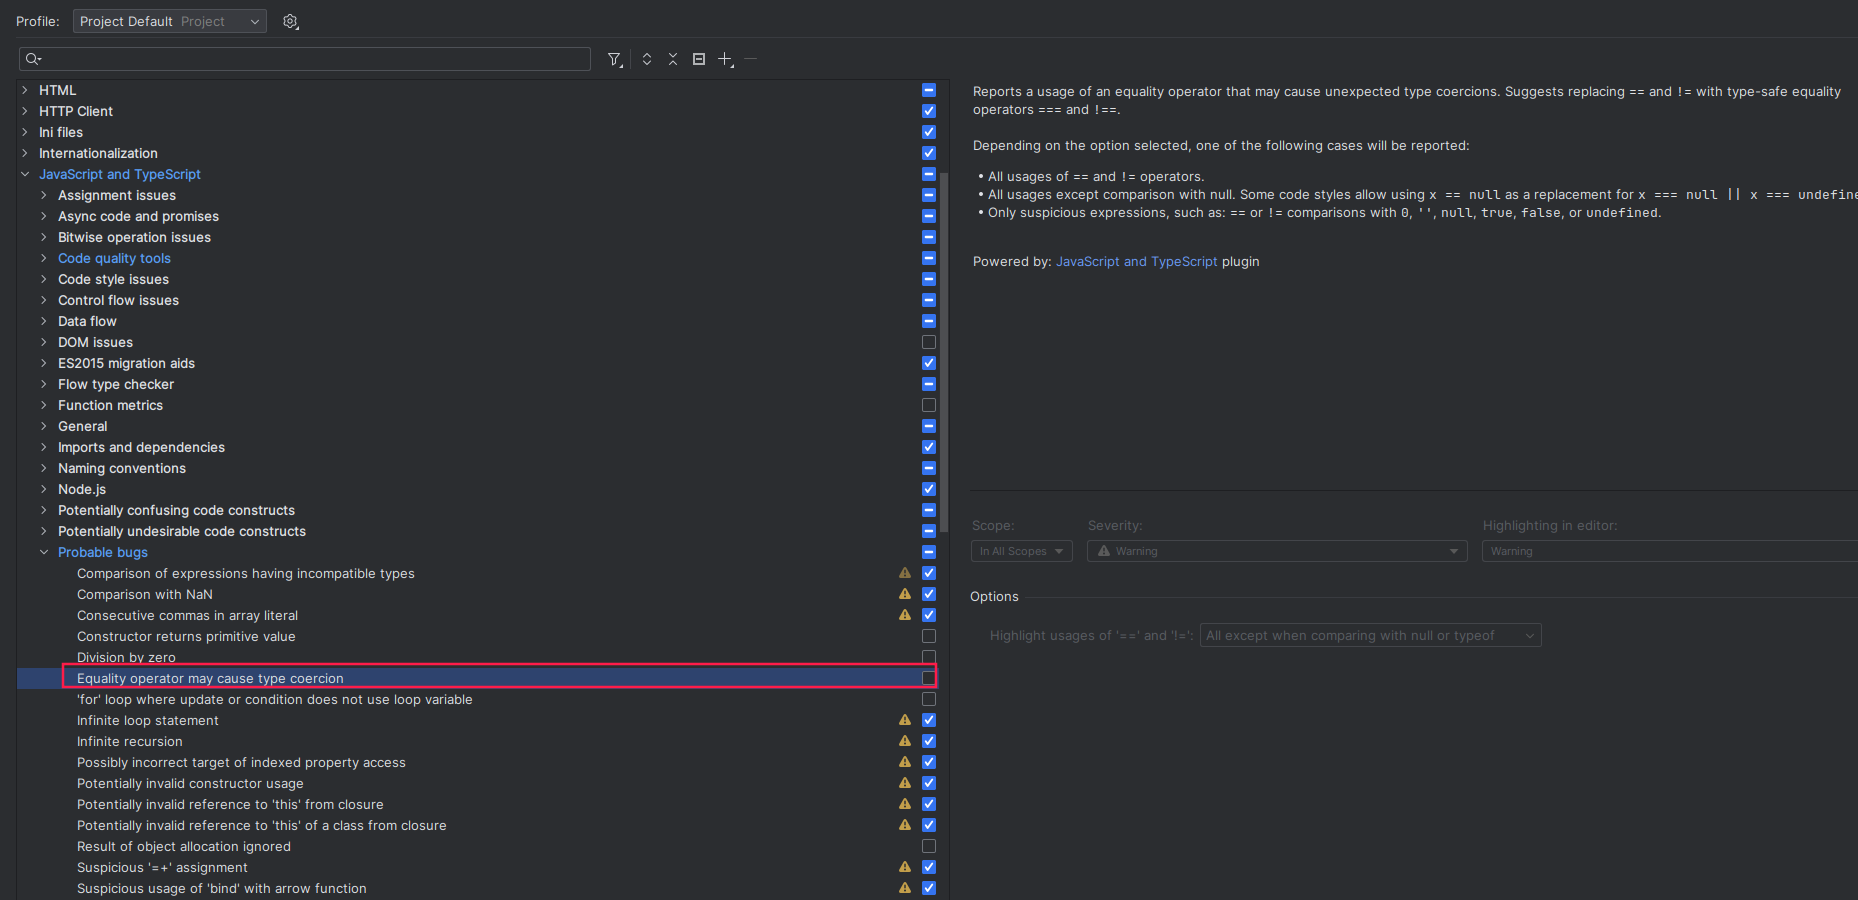
去掉js相等警告

去掉js相等警告

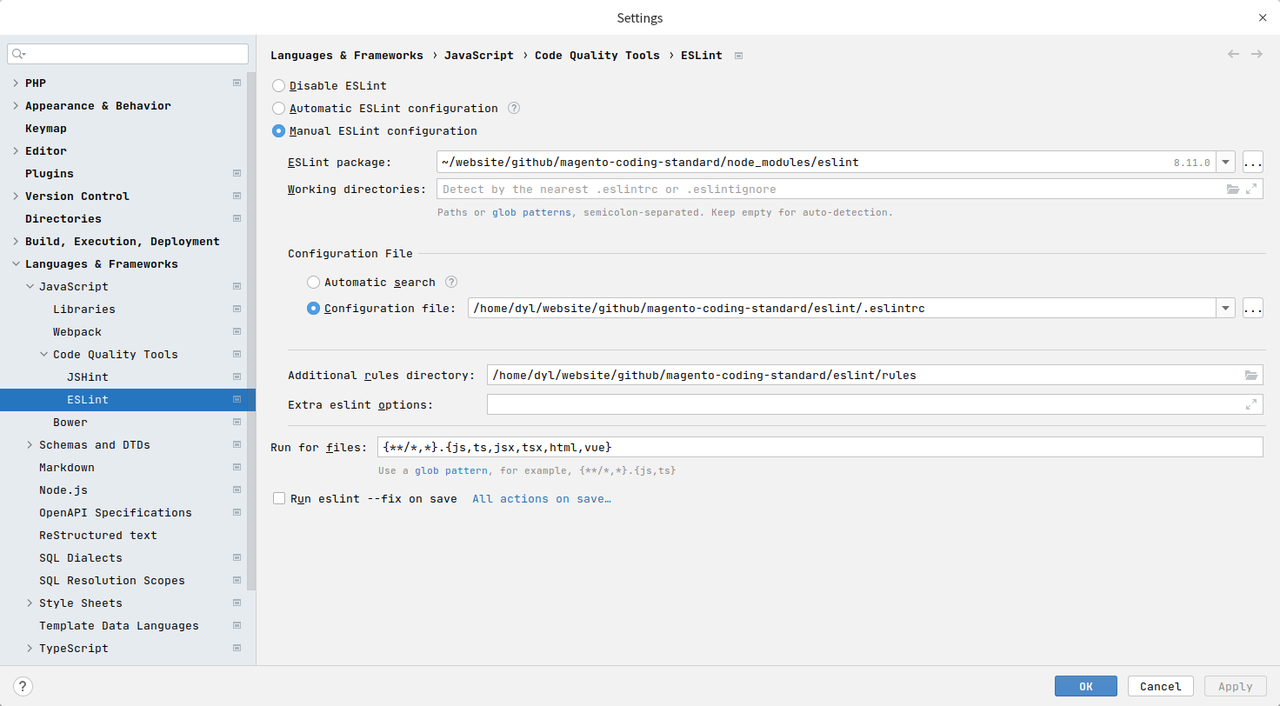
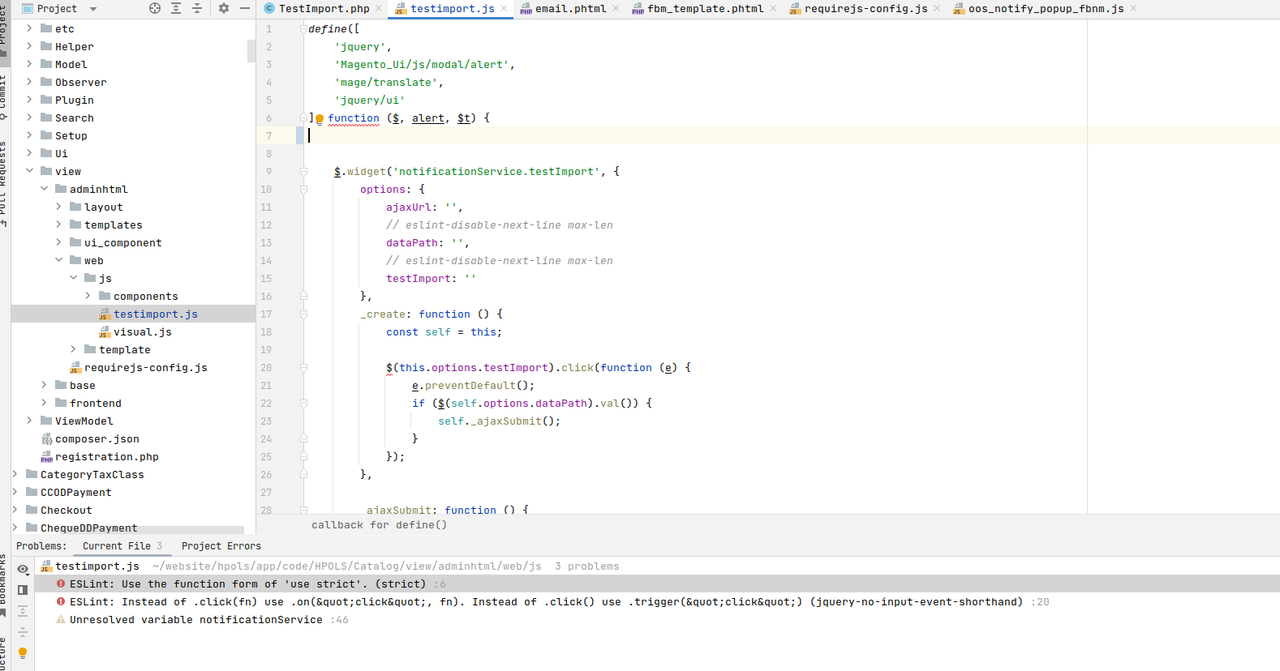
eslint 搭法

eslint 搭法
eslint 搭法

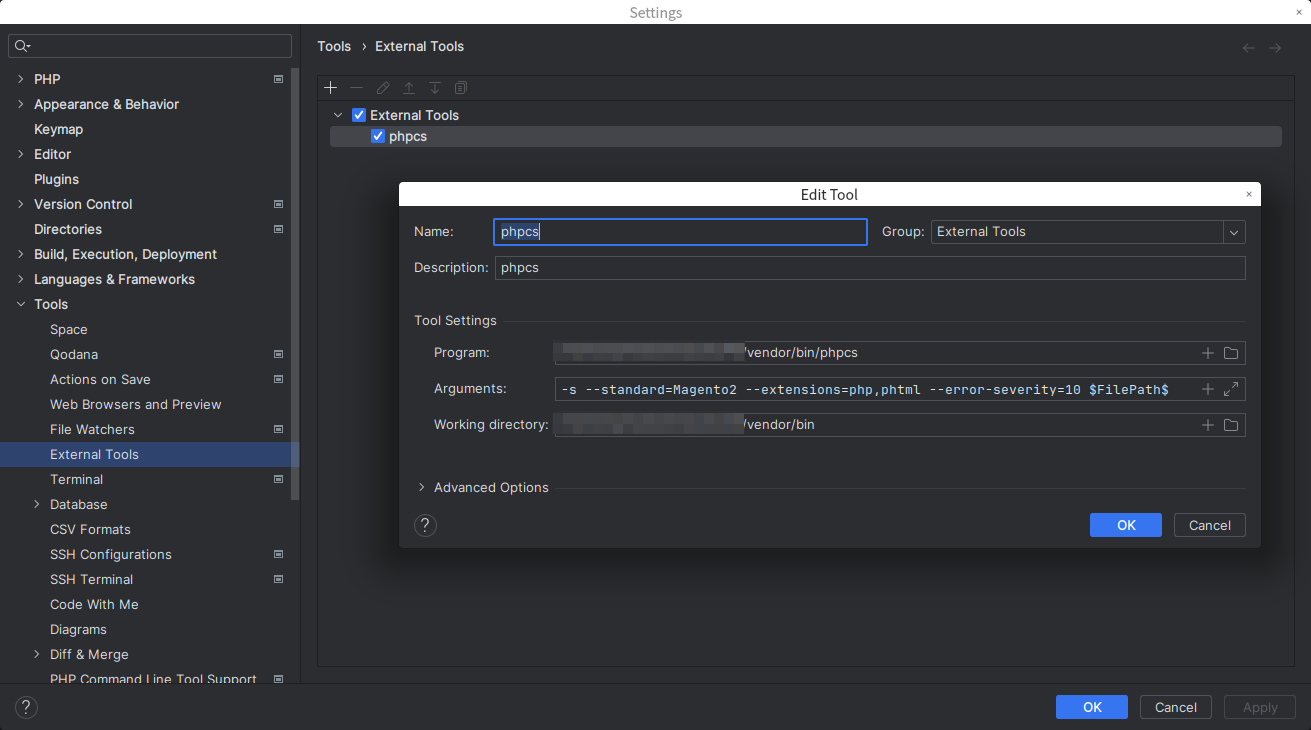
phpcs搭法

如果最新的vendor如果没有包含phpcs等检测工具,我们可以间接使用默认的2.4.5-p1中的phpcs进行项目的检测

右键phpcs添加方法

右键phpcs设置方法.png

0%